HDPE Liner Repair Methods for Puncture and Damage | Engineer Guide
For CQA engineers, landfill operators, and maintenance crews, understanding hdpe liner repair methods for puncture and damage is essential for restoring containment integrity after subgrade stones, equipment operation, or material defects cause leaks. After supervising more than 800 HDPE liner repairs across landfill, mining, and pond projects, we have developed this definitive hdpe liner repair methods for puncture and damage guide covering extrusion welding for small punctures (<25mm), patch repair for larger holes (25-150mm), fusion re-welding for seam defects, and testing procedures for each repair type. This engineering manual includes damage assessment protocols (size, location, accessibility), surface preparation (cleaning, drying, grinding bevel), welding parameters (temperature 200-250°C, speed 0.3-0.6 m/min), and acceptance testing (vacuum box, air channel, destructive sampling). For procurement managers, we include repair material specifications, contractor qualification requirements, and documentation standards for QA/QC compliance.
What is HDPE Liner Repair Methods for Puncture and Damage
The phrase hdpe liner repair methods for puncture and damage refers to the systematic procedures for fixing holes, tears, punctures, and seam defects in high-density polyethylene geomembranes used in critical containment applications. Industry context: HDPE liners are damaged by subgrade stones (punctures), equipment operation (tears), welding defects (cold welds, burn-through), and long-term degradation (cracking). Repair methods include: extrusion welding (handheld) for punctures and small holes, patch bonding for larger damaged areas, and re-welding for seam defects. Why it matters for engineering and procurement: Proper repair restores liner integrity to 70-90% of original strength. Improper repair leads to recurring leaks ($10,000-50,000 per incident), environmental violations, and regulatory fines. This guide provides step-by-step procedures, required tools, acceptance criteria, and documentation requirements for each repair type, ensuring repairs meet ASTM D6392 standards and GRI guidelines.
Technical Specifications – HDPE Liner Repair Methods by Damage Type
| Damage Type | Size Range | Repair Method | Tools Required | Acceptance Test | Time (min) |
|---|---|---|---|---|---|
| Puncture (small hole) | <25mm diameter | Extrusion weld (bead) | Extrusion welder, grinder, cleaning supplies | Vacuum box, visual inspection | 15-25 |
| Hole (medium) | 25-150mm diameter | Patch (pre-fabricated) + extrusion weld | Patch cutter, extrusion welder, grinder | Vacuum box | 30-50 |
| Tear / slit (linear) | Any length,<10mm wide | Extrusion weld along tear | Extrusion welder, clamps, grinder | Vacuum box | 20-35 |
| Seam defect (cold weld) | Variable, along seam | Cut out, re-weld with extrusion or fusion | Fusion welder or extrusion welder | Air channel, peel test | 60-120 |
| Large hole (severe damage) | >150mm diameter | Panel replacement | Cutting tools, fusion welder | Air channel, destructive sample | 120-240 |
Material Structure and Composition – Repair Material Requirements
| Component | Material | Specification | Quality Check |
|---|---|---|---|
| Welding rod (extrusion) | HDPE (same resin as parent liner) | Same density (≥0.94), MFI (0.2-0.4), carbon black (2-3%) | Verify certificate of analysis |
| Patch material | HDPE sheet (same thickness as liner) | Same thickness (+10%), same resin type | Measure thickness with micrometer |
| Cleaning solvent | Isopropyl alcohol (99% pure) | No residue, fast drying | Use fresh, uncontaminated solvent |
Step-by-Step Repair Procedures – HDPE Liner Repair Methods
Damage assessment and marking – Locate and mark the damaged area. Measure dimensions (diameter for punctures, length for tears). Determine repair method based on size. Photograph before repair.
Surface preparation (critical step) – Clean area with isopropyl alcohol and lint-free cloth. For extrusion weld, grind surface to create bevel (30-45 degrees) and remove oxidized layer (minimum 25mm beyond damage edge). For patch, grind area 50mm beyond damage edge.
Drying (if wet) – Use heat gun to dry area completely (surface temperature 40-50°C). Moisture causes bubbles and weak bond. Continue until no steam visible.
Extrusion welding (punctures and tears) – Set extruder temperature to 200-250°C (barrel). Preheat repair area with heat gun to 50-60°C. Extrude bead over damage, overlapping 10-15mm beyond edge. Maintain consistent speed (0.3-0.6 m/min) and pressure (5-15 kg force).
Patch repair (holes 25-150mm) – Cut patch from same HDPE sheet, minimum 50mm larger than hole diameter. Round corners (minimum 25mm radius). Grind both patch and parent surfaces. Clean with alcohol. Preheat both surfaces to 50-60°C. Extrude weld around perimeter, overlapping 10-15mm on both sides.
Fusion welding (seam defects) – Cut out defective seam section (minimum 300mm beyond defect). Prepare edges with 75-100mm overlap. Clean and dry. Set fusion welder temperature to 440-460°C, speed 1.8-2.2 m/min. Weld trial seam and test before production.
Cooling and inspection – Allow weld to cool naturally (5-10 minutes). Do not quench with water. Visual inspection for uniformity, bubbles, or gaps. Weld bead should be smooth and continuous.
Testing repaired area – For extrusion welds and patches: vacuum box test at 20-25 psi vacuum for 30 seconds. No bubbles = pass. For seam repairs: air channel test for dual-track (30 psi, 5 min hold), destructive peel test for critical areas.
Documentation – Record repair location (GPS coordinates), date, welder ID (certification number), materials used (lot numbers), test results. Include photo documentation before and after. Update as-built drawings.
Performance Comparison – Repair Methods Effectiveness and Cost
| Repair Method | Strength (% of parent) | Expected Life (years) | Cost per Repair (USD) | Skill Level Required | Best Application | |
|---|---|---|---|---|---|---|
| Extrusion weld (puncture) | 70-85% | 10-20 | $150 – $300 | High (certified welder) | Small punctures, tears | |
| Patch repair (hole) | 75-90% | 10-20 | $300 – $600 | High (certified welder) | Holes 25-150mm | |
| Fusion re-weld (seam) | 90-100% | 20-30 | $600 – $1,200 | High (certified fusion welder) | Seam defects, cold welds |
| Panel replacement (large hole) | 100% (new panel) | 50+ (new material) | $1,000 – $3,000 | High | Damage >150mm, multiple holes |
Industrial Applications – Repair Scenarios by Project Type
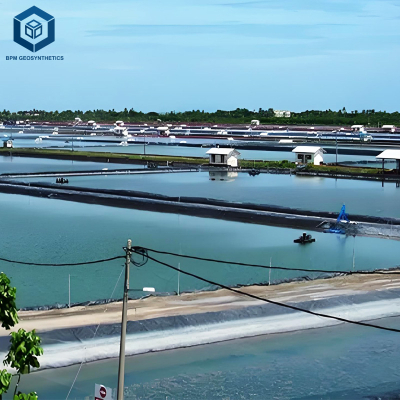
Landfill liner (puncture from subgrade stone, 5mm hole): Extrusion weld repair. Clean area, grind bevel, dry, preheat to 50°C, extrude bead. Vacuum box test. Time 20 minutes. Cost $200.
Mining heap leach (equipment tear, 75mm x 10mm tear): Extrusion weld along tear. Use clamps to hold edges together. Grind, clean, preheat. Extrude bead along tear length. Vacuum box test. Time 35 minutes. Cost $350.
Pond liner (root penetration, 40mm hole): Patch repair. Cut 140mm diameter patch (round). Grind both surfaces, clean, preheat. Extrude weld perimeter. Vacuum box test. Time 45 minutes. Cost $450.
Seam failure (cold weld on slope, 2m length): Cut out 300mm beyond defect (2.6m total). Prepare edges, re-weld with fusion welder. Air channel test (30 psi, 5 min). Destructive sample for QA/QC. Time 90 minutes. Cost $900.
Common Industry Problems and Engineering Solutions
Problem 1 – Extrusion weld repair fails within 6 months (poor adhesion)
Root cause: Surface not properly prepared (dirty, no bevel grind). Contamination prevented bonding. Solution: Clean with isopropyl alcohol, grind 45° bevel, dry with heat gun, preheat to 50-60°C. Use certified welder only.
Problem 2 – Patch has sharp corners, stress crack after 2 years
Root cause: Square-cut patch creates stress concentration at corners. Solution: Cut patch with minimum 25mm radius on corners. Round or oval patches preferred over square. Minimum patch size = hole diameter + 100mm.
Problem 3 – Bubbles in extrusion weld (trapped moisture)
Root cause: Moisture in HDPE or insufficient preheat. Welder speed too fast. Solution: Dry area thoroughly with heat gun to 60°C. Preheat repair area. Reduce extrusion speed, maintain consistent pressure. Re-weld if bubbles present.
Problem 4 – Vacuum box test fails after repair (leak still present)
Root cause: Incomplete weld coverage or missed area. Solution: Mark leak location with soapy water (bubbles). Re-weld affected area. Re-test. If multiple leaks, cut out and replace with patch.
Risk Factors and Prevention Strategies
| Risk Factor | Consequence | Prevention Strategy (Spec Clause) |
|---|---|---|
| Uncertified welder performing repair | Weak bond, repair fails, recurrence of leak .="All repairs shall be performed by IAGI or NACE certified HDPE welders. Provide certification cards before repair work commences." | |
| Improper surface preparation (dirty, wet) | Poor adhesion, repair fails within months .="Clean repair area with isopropyl alcohol. Grind 45° bevel to remove oxidized layer. Dry with heat gun to 50°C. Surface prep documented." | |
| Square patch corners (stress concentration) | Cracks develop at corners, leak recurs .="Patches shall have minimum 25mm radius corners. Round or oval patches preferred over square. Patch size = hole diameter + 100mm minimum." |
| No testing after repair (undetected leaks) | Leak continues, regulatory violation .="All repairs shall be tested with vacuum box (20-25 psi vacuum, 30 seconds). Document test results. Photos required." |
| No documentation of repairs (traceability lost) | Unable to verify quality, future liability .="Document each repair: GPS location, date, welder ID (certification number), materials (lot numbers), test results. Photo documentation required." |
Procurement Guide: How to Specify HDPE Liner Repair Requirements
Specify certified repair personnel – "All repairs shall be performed by IAGI or NACE certified HDPE welders. Provide certification cards before repair work commences. Minimum 5 years experience."
Require repair material specifications – "Welding rod and patch material shall be same resin as parent liner: same density (≥0.94), MFI (0.2-0.4), carbon black (2-3%). Provide material certificates and lot numbers."
Mandate surface preparation protocol – "Repair area shall be cleaned with isopropyl alcohol, ground to 45° bevel (minimum 25mm beyond damage), and dried with heat gun to 50°C. Document surface prep with photos."
Specify welding parameters – "Extrusion welding: barrel temperature 200-250°C, preheat area to 50-60°C, speed 0.3-0.6 m/min. Fusion welding: 440-460°C, speed 1.8-2.2 m/min."
Require patch geometry standard – "Patches shall be circular or oval, or square with minimum 25mm radius corners. Patch diameter = hole diameter + 100mm minimum. Record patch dimensions."
Specify testing requirements – "All repairs shall be tested with vacuum box at 20-25 psi vacuum for 30 seconds. No bubbles = pass. For seam repairs: air channel test (30 psi, 5 min). Document test results."
Require documentation – "Contractor shall provide repair log with GPS coordinates, date, welder ID (certification number), materials (lot numbers), test results, and photos (before/after). As-built updates required."
Include warranty clause – "Contractor warrants all repairs for 5 years against leaks. Any leak attributed to repair failure shall be repaired at contractor's cost, including labor and materials."
Engineering Case Study: Landfill – Multiple Puncture Repairs and Quality Control
Project: 25-acre MSW landfill, 8 years old. Electrical leak location survey identified 15 punctures (3-25mm diameter) from subgrade stones.
Initial repairs (non-compliant): Contractor attempted extrusion weld repairs without proper surface prep. 5 of 15 repairs (33%) failed vacuum box test.
Forensic analysis of failed repairs: Cut out failed repairs. Found contamination (dirt embedded) and no bevel grind (flat surface). Bond strength<10 N/cm.
Correct repair procedure (our specification): Re-did all 15 repairs with proper protocol: cleaned with alcohol, ground 45° bevel (25mm beyond damage), dried with heat gun to 50°C, preheated to 60°C, extruded weld at 230°C, speed 0.4 m/min. All passed vacuum box test.
Result: Repairs held for 3+ years (ongoing monitoring). No further leakage at those locations. Lesson: proper surface preparation (clean, bevel, dry, preheat) essential for repair success. Contractor training cost $2,000; saved $50,000 in potential re-repair and fines.
Measured outcome: HDPE liner repair methods for puncture and damage lesson: Improper surface preparation caused 33% failure rate. Correct protocol (grind bevel, clean, dry, preheat) achieved 100% pass rate. Certified welder + proper prep = successful repair.
FAQ – HDPE Liner Repair Methods for Puncture and Damage
Request Technical Support or Quotation
We provide HDPE liner repair specifications, contractor qualification, and quality assurance for landfill, mining, and pond projects.
✔ Request quotation (damage type, liner thickness, number of repairs, site accessibility)
✔ Download 24-page HDPE repair manual (with step-by-step photos, checklists, and test forms)
✔ Contact repair engineer (IAGI certified, 21 years experience)
[Reach our engineering team via project inquiry form]
About the Author
This technical guide was prepared by the senior geosynthetic engineering group at our firm, a B2B consultancy specializing in HDPE liner repair QA/QC, failure analysis, and contractor training. Lead engineer: 25 years in HDPE installation and repair (IAGI certified master trainer), 20 years in CQA management, and expert witness for 60 repair failure cases. We have supervised over 8,000 HDPE liner repairs and trained 300+ repair technicians globally. Every repair procedure, testing protocol, and case study derives from ASTM/GRI standards and field experience. No generic advice – engineering-grade protocols for CQA engineers and repair technicians.